
|
Lambda AV have done just a few projector installs… ;) We’ve even written a few projection articles on choosing the right projector or screen and even the nerdy things about how projection works. We get a lot of questions on projection not just on choosing what projector to use but mounting recommendations for that projector model. Choosing a projector and its various pieces is a bit of an art form, but specifically based on the task it will be used for and the place it will be installed. 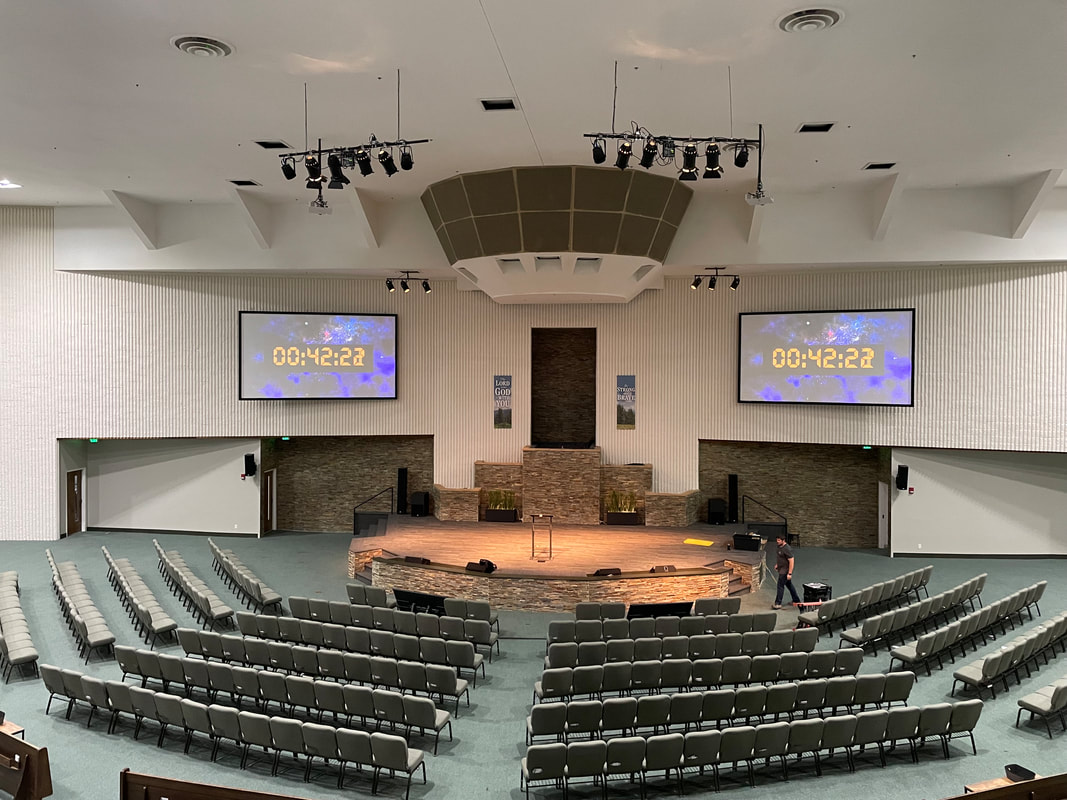 To help illustrate this let’s look at an installation we recently completed at a church in Colorado Springs: East Side Church of Christ (ESCC). This is a unique church because of its more traditional feel, but large size building, ceiling height and bright room lighting. Because of these issues, as well as age of their current projection system, the church needed an upgrade. Their projectors were installed with hanging mounts from the ceiling at a height of almost 30ft from the ground and were located roughly in the middle of the room. The projectors were bulb models at 6000 lumens and fitted with short throw lenses. This combination, of projector and location, led to some interesting challenges. In a standard bulbed projector the bulb occasionally needs to be changed and as it ages it loses its brightness. With the projectors mounted in the middle of the room and at a massive height this meant renting a lift on a regular basis to change the bulb and if a bulb failed during a critical time, there was no way to quickly fix it. In addition, the projectors were installed higher than the top edge of the projector screens and tilted down causing the need for digital geometry changes. This caused a shadow on the top edge of the screen as the light angle started above the raised frame edge of the screen. Not a great look! 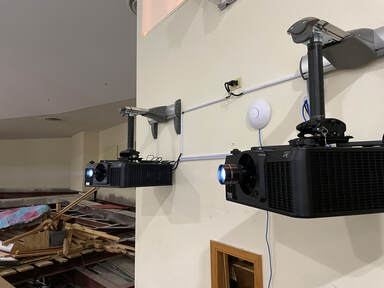 Whenever we install new equipment, even when it’s simply a piece upgrade to a new model, Lambda will look at the whole setup and see if it can be improved. Every system was installed for specific reasons, but we can only speculate as to the original intentions behind certain setups. However, many of the problems with ESCC came from common misconceptions about projection. The first misconception is the connection between brightness and the distance from the screen. When it comes to distance on a projector, the image is not brighter when the projector is closer to the screen. There is a slight loss of brightness but in fact nothing notable for most mid-sized rooms. What will be noticeable is light loss based on optics. Each lens used in a projector has either a fixed or variable F-stop range. F-stop works just like a camera lens and the lower the number the more the light can get through the lens. With many high-power projector lenses, closer placement means using a wide-angle lens which usually has a higher F-stop. So, it is possible to place a projector closer and it will look dimmer. With that in mind, lens capability is always something we want to look at. Projector placement is just as important as lens capability. Ideally, in a perfect world we want a projector to have the clearest, straightest shot at a screen possible, but projectors these days have so many tools to be able to adjust for non-perfect situations. Even though projectors have more capabilities, we still want to use those as little as possible. Why is that? With standard and long throw lenses, light typically comes out at an angle. By angle I mean if we place the projector on a table and a screen in front of it with the bottom edge of the screen just below the lens of the projector, the light angle is upward and will fill the screen. Just the same, if we hang a projector upside down at the top of a screen the light angles down. There are some exceptions to this such as: a short throw lens is built for rear projection and light comes out equally top and bottom in which case, the projector should be mounted centered to the screen.
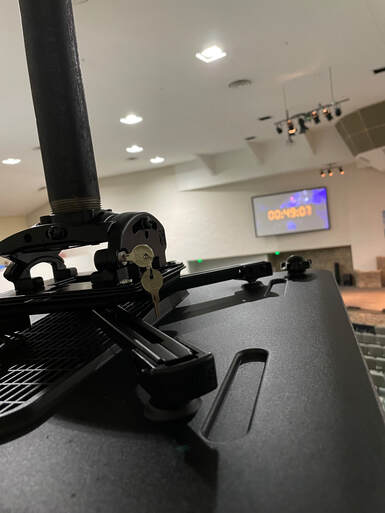
With this install specifically Lambda needed to correct most of the issues to get the image looking great in the room. We replaced the old lamp-based projectors with new laser projectors. We bumped the brightness up from 6000 lumens to 7700 lumens to make things brighter and with new laser technology, eliminated tricky bulb replacement for the church. We used long throw lenses on these projectors and moved the projectors from the high ceiling and onto a wall in the balcony. We used some of our very favorite Chief mounts to securely mount the projectors to the wall. With the new placement, they projectors are high enough to be above people’s heads, but low enough to keep the projector light below the top edge of the screen, eliminating the shadow. There are many great projector mounts designed for many specific situations such as wall mounting, short throw, ceiling mount, vibration dampening. It’s always worth it to spend time to pick the right one. Good projector mounts provide easy adjustment and can take the headache of aiming a projector and make it quick and easy. While mounting we also set the angle, positioning, and zoom to use an absolute minimum of digital adjustment for a sharp image. In short, we love good mounts and more costly, solid mounts are worth it. One last recommendation we have when considering a projector replacement: is to always run network connections to projectors. Most projectors are not mounted in locations easily reached by a small remote and sometimes when you have two projectors near each other it can be hard to get both turned on or off. With a simple network cable to your projectors, you can make control as easy as clicking a link in your web browser. No more waiving that remote around trying to control your projector! If you have questions related to projector choice or any of the various pieces discussed in this article, please reach out to us. As integrators, it’s our job to look at all the variables and any challenges in your specific situation to correctly line up all the pieces and make things work as well as possible and produce a noticeable difference.
0 Comments
Your comment will be posted after it is approved.
Leave a Reply. |
AuthorsAll of the Lambda Staff contribute to the Blog. If you have any questions about the info we provide, please don't hesitate to ask! ResourcesCheck out our resources page for FREE checklists and tools we mention in articles! We are here to help you improve and maintain your Audio Visual Systems!
Categories
All
|
 RSS Feed